Woodworking can be a rewarding activity for beginners looking to unleash their creativity. Whether you’re interested in building furniture, home decor, or small crafts, there are plenty of easy woodworking projects to get you started. In this post, we will explore 10 easy woodworking projects suitable for beginners that will help you develop your skills and gain confidence in working with wood.
Simple Wooden Coasters
Wooden coasters are a popular and practical addition to any home decor. Making your own simple wooden coasters can be a fun and easy DIY project. To start, gather your materials including wooden squares, sandpaper, wood stain, paintbrush, and felt pads. You can find detailed step-by-step instructions on how to make wooden coasters on websites like DIY Network.
First, sand down the edges of the wooden squares to ensure they are smooth and free of any splinters. Next, apply wood stain to the coasters using a paintbrush, making sure to cover the entire surface. Allow the stain to dry completely before adding a second coat if desired.
Once the stain is dry, attach felt pads to the bottom of the coasters to prevent scratches on your furniture. Your simple wooden coasters are now ready to use and can be a great personalized touch to your living space.
For more design ideas and inspiration, you can also browse through crafting websites like Etsy or watch tutorial videos on platforms like YouTube to customize your wooden coasters with different patterns or colors.
Creating your own simple wooden coasters is a cost-effective way to add a touch of rustic charm to your home while also protecting your surfaces from water rings and heat damage.
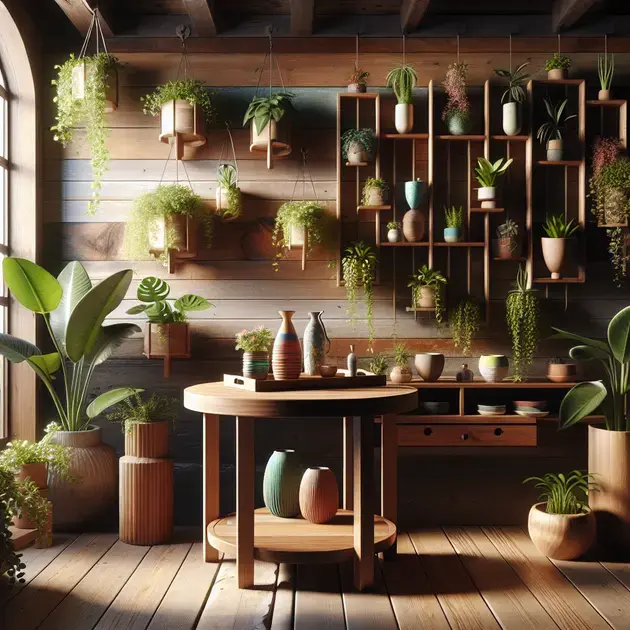
DIY Hanging Plant Shelf
A hanging plant shelf is a stylish and space-saving way to display your favorite plants indoors. To create your own DIY hanging plant shelf, you will need materials such as wooden planks, rope or chains, hooks, drill, and plants of your choice. Websites like Home Depot offer detailed guides on building a hanging plant shelf.
Start by measuring and cutting the wooden planks to your desired shelf size. Use a drill to create holes in the corners of the planks for attaching the rope or chains. Next, attach the ropes or chains to the wooden planks securely, ensuring they can support the weight of the plants.
Once the structure is complete, use hooks to hang the plant shelf from the ceiling or a sturdy support. Arrange your potted plants on the shelves, making sure they are secure and won’t fall. Consider adding decorative elements like fairy lights or macrame plant hangers for an extra touch of style.
Regularly check the stability of your DIY hanging plant shelf and adjust the height as needed to ensure the safety of your plants. Websites like Lowes provide tips on maintaining indoor plants and ensuring they receive adequate sunlight and water.
With a DIY hanging plant shelf, you can bring a touch of greenery into your home and create a visually appealing display that showcases your plant collection in a unique way.
Rustic Wall Mounted Key Holder
A rustic wall-mounted key holder is not only a functional piece but also a decorative accent for your entryway. To make your own rustic key holder, gather materials such as a wooden board, hooks, screws, drill, and a hammer. You can find step-by-step tutorials on creating a rustic key holder on websites like instructables.com.
Start by staining or painting the wooden board in a rustic finish to complement your home decor. Measure and mark the placement of the hooks on the board, ensuring they are evenly spaced. Use a drill to create pilot holes for the screws that will secure the hooks in place.
Attach the hooks to the wooden board using screws and a screwdriver or drill. Make sure the hooks are secure and can hold the weight of your keys. Once the hooks are in place, hang the key holder on the wall using nails or wall anchors to ensure it is sturdily mounted.
You can customize your rustic key holder further by adding decorative elements such as a small chalkboard for notes or a mason jar for holding spare change. Consider personalizing the key holder with your initials or a favorite quote using stencils and paint.
Having a rustic wall-mounted key holder not only keeps your keys organized and easily accessible but also adds a charming touch to your entry space. Explore different design ideas and embellishments to make your key holder unique to your personal style.

Woodworking Ideas for Small Spaces
Woodworking in small spaces can be challenging, but it is definitely doable with the right projects. One great idea for small spaces is creating wall-mounted shelves. These shelves not only provide extra storage but also add a touch of rustic charm to your space. Another idea is making a foldable desk that can be easily tucked away when not in use. This can be a space-saving solution for anyone with limited room to work on.
To get started on these woodworking projects, you will need some basic tools like a saw, drill, and sandpaper. Additionally, using reclaimed wood can add character to your creations while being environmentally friendly. Remember to measure your space carefully before starting any project to ensure a perfect fit.
Step by step guide:
1. Choose the woodworking project that fits your space.
Consider the dimensions of your small space and select a project that will maximize the use of that area. Whether it’s a floating shelf or a compact side table, make sure it serves a practical purpose.
2. Gather the necessary tools and materials.
Make sure you have all the tools and materials required for the project. This includes wood, screws, nails, and any decorative elements you may want to add.
3. Measure and cut the wood to size.
Accurate measurements are crucial, especially in small spaces where every inch counts. Use a saw to cut the wood to the desired dimensions.
4. Assemble the pieces together.
Follow the instructions or design plan to put the pieces together. Use a drill to secure the connections and add stability to your woodworking project.
5. Sand and finish the wood.
Smooth out any rough edges with sandpaper and add a finish to protect the wood from wear and tear. This final step will give your project a polished look.
Beginner-Friendly Wood Crafts to Try Now
For beginners looking to dip their toes into woodworking, there are plenty of simple and rewarding crafts to try. One idea is making wooden coasters, which are both practical and decorative. Another fun project is creating a wooden plant stand to showcase your favorite greenery in style.
Working with wood as a beginner can be a fulfilling experience, and with the right guidance, you can create beautiful pieces for your home. Start with small projects that require minimal tools and gradually work your way up to more complex designs.
Step by step guide:
1. Start with a simple project.
Choose a beginner-friendly project like a wooden picture frame or a small shelf to build your confidence in woodworking techniques.
2. Invest in essential woodworking tools.
Having the right tools is essential for any woodworking project. Invest in a saw, hammer, and sandpaper to get you started on your crafting journey.
3. Follow tutorial videos or guides.
There are plenty of online tutorials and guides that can help you learn the basics of woodworking. Watch step-by-step videos to understand the process better.
4. Practice patience and precision.
Woodworking requires attention to detail and patience. Take your time with each step of the project to ensure a high-quality outcome.
5. Experiment with different wood types and finishes.
As you gain more confidence, try working with different types of wood and experimenting with various finishes to create unique crafts that reflect your style.
Creative Wooden Projects for Novice Makers
For novice makers eager to explore their creativity with wood, there are endless possibilities for exciting projects. One innovative idea is creating a wooden wall art piece using different wood stains and techniques. This project allows you to showcase your artistic skills while working with natural materials.
Another creative wooden project to consider is making a serving tray with intricate designs. This piece can be both functional and visually appealing, adding a touch of elegance to your dining or living room.
Step by step guide:
1. Sketch out your design.
Before starting your project, sketch out the design you want to create. This will give you a visual guide to follow as you work on your wooden masterpiece.
2. Choose the right wood for your project.
Consider the type of wood that suits your design and purpose. Whether it’s oak for a sturdy tray or pine for a more decorative piece, selecting the right wood is crucial.
3. Experiment with wood stains and finishes.
Play around with different wood stains and finishes to enhance the natural beauty of the wood. This step allows you to personalize your project and create a unique piece of art.
4. Use woodworking techniques to bring your design to life.
Practice woodworking techniques like cutting, sanding, and joining pieces together to assemble your project. Take your time to ensure precision and accuracy in every step.
5. Add final touches and details.
Once your project is assembled, add any final touches or details to enhance its appearance. Whether it’s decorative elements or a protective coat, these finishing touches can elevate your wooden creation.
Conclusion
Woodworking in small spaces presents unique challenges, but with the right projects, it can be an enjoyable and fulfilling endeavor. Creating wall-mounted shelves and foldable desks are excellent ideas that not only maximize storage but also add aesthetic value to your space. Utilizing basic tools like a saw, drill, and sandpaper, along with reclaimed wood, can enhance the character of your creations while being environmentally conscious. Remember, precise measurements are key in small spaces to ensure a perfect fit for your projects.
For beginners,
venturing into woodworking offers a world of possibilities. Simple crafts like wooden coasters and plant stands can kickstart your journey, providing a blend of functionality and creativity. Starting with minimal tools, gradually progressing to more complex designs, and exploring different wood types and finishes allows you to hone your skills and create unique pieces reflecting your style.
For novice makers,
the realm of creative wooden projects is boundless. Crafting wooden wall art pieces with various stains and techniques or designing intricate serving trays adds elegance and personal touch to your space. By sketching designs, choosing the right wood, experimenting with finishes, and employing woodworking techniques meticulously, you can bring your artistic visions to life, culminating in visually appealing and functional wooden creations.